
Embarking on a journey through the intricate landscape of ios data recovery, digital forensics, uncovering buried insights within iOS devices demands a meticulous and systematic approach.
Join us on this step-by-step expedition, unveiling buried data through practical techniques tailored for professional digital forensic analysts.
Topics
Expert Tips for iOS buried data recovery
Step 1 : Access iTunes Backups
1. **Open iTunes Application :** In this iOS data recovery tutorial, start by launching the iTunes application on your computer.
2. **Connect the iOS Device :** Utilize a USB cable to establish a connection between the iOS device and your computer for this iTunes backup extraction guide.
3. **Access Device Summary :** Click on the device icon within iTunes to reach the device summary, a crucial step in the recover recently deleted photos process.
4. **Navigate to “Backups” :** In the device summary, locate and select the “Backups” section, the hub for the comprehensive iOS data retrieval journey.
5. **Choose Relevant Backup :** Identify and select the backup file containing the historical data you’re seeking for your hidden data recovery on iPhone.
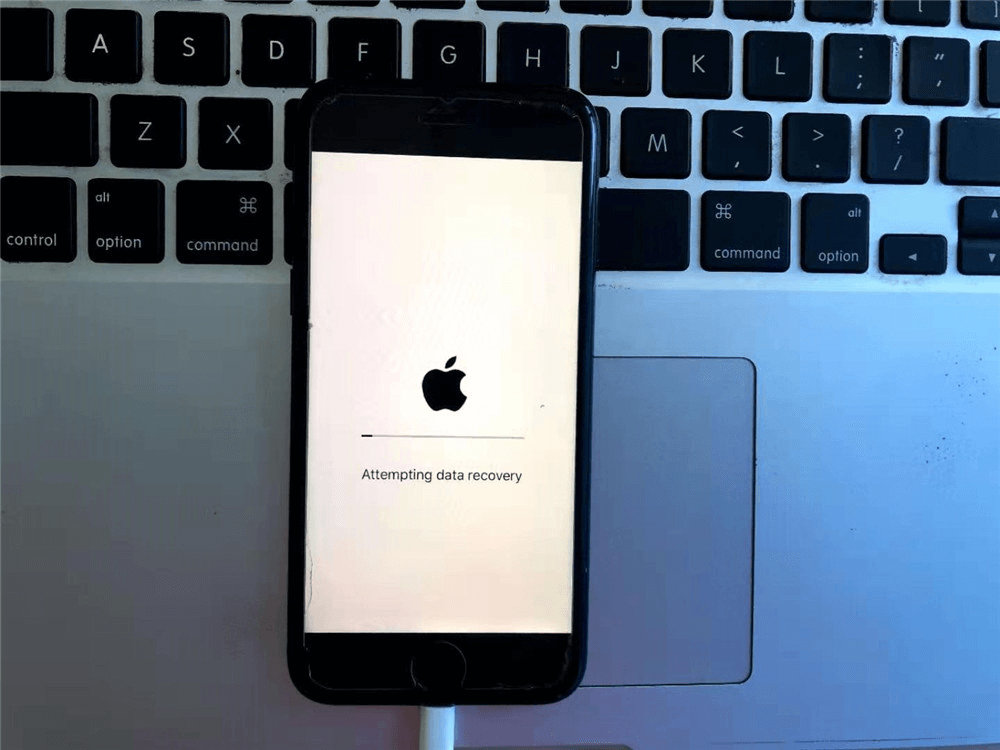
6. **Extract Data :** Initiate the extraction of buried data by clicking on “Restore Backup,” a key step in the iTunes backup decryption process.
Step 2 : Recover Recently Deleted Photos
1. **Launch Photos App : ** Open the “Photos” app on the iOS device, a fundamental step in the uncovering buried insights on iPhone process.
2. **Navigate to “Albums” : ** Scroll through and tap on “Albums,” an essential part of the step-by-step iOS data recovery.
3. **Access “Recently Deleted” : ** Locate and tap on “Recently Deleted” to uncover potentially buried photos, a crucial aspect of hidden data recovery on iPhone.
4. **Select Desired Photos : ** Choose the photos you wish to recover from the buried selection for a comprehensive iOS data retrieval.
5. **Recover Photos : ** Click “Recover” to restore the selected photos from the depths, an essential step in the iTunes backup extraction guide.
Step 3: Utilize the iSearch Function
1. **Swipe Down for Search Bar :** Swipe down on the home screen to reveal the search bar, a pivotal point in the iOS device security with malware report.
2. **Enter Keywords or Symbols :** Type in relevant keywords or symbols linked to the buried data, a crucial component in preventing security threats on iOS.
3. **Review Search Results :** Examine the search results to pinpoint buried information, an integral part of the digital forensics on iOS devices process.
4. **Tap to Open :** Tap on the relevant result to open and delve into the buried data, a key step in iRecovery Stick user guide.
Step 4 : Navigate Multimedia Files with Precision
1. **Launch Photos App :** Open the “Photos” app, a crucial aspect of the iRecovery Stick vs. other tools comparison.
2. **Explore Albums :** Navigate through albums or folders where multimedia files might be buried, an essential part of hidden data recovery on iPhone.
3. **Consolidate Media Files :** Look for folders consolidating media files, especially those hiding in plain sight, an integral aspect of uncovering buried insights on iPhone.
4. **Review Hidden Images :** Examine images within these folders, uncovering buried multimedia content, a pivotal point in preventing security threats on iOS.
5. **Tap to Open :** Interact with each image to unveil buried details and connections, a crucial component in the digital forensics on iOS devices process.
Step 5 : Decode Voicemail Details
1. **Access Voicemail App :** Open the “Phone” app and go to the “Voicemail” tab, a fundamental step in the uncovering buried insights on iPhone process.
2. **Select Voicemail :** Choose a voicemail message holding potentially buried details, an essential part of the hidden data recovery on iPhone.
3. **View Details :** Investigate the details section to decode sender phone numbers, dates, and filenames, a pivotal point in iOS data recovery tutorial.
4. **Extract Information :** Extract buried insights from voicemails, potentially revealing hidden narratives, an integral aspect of uncovering buried insights on iPhone.
Step 6 : Decrypt Passwords and Siri Commands
1. **Open Settings :** Launch the iOS device’s “Settings” app, an essential part of hidden data recovery on iPhone.
2. **Navigate to Passwords :** For buried passwords, access “Passwords & Accounts” or equivalent, a crucial component in uncovering buried insights on iPhone.
3. **Decrypt Siri Commands :** Locate Siri settings in “Settings” to uncover buried voice commands, an integral aspect of preventing security threats on iOS.
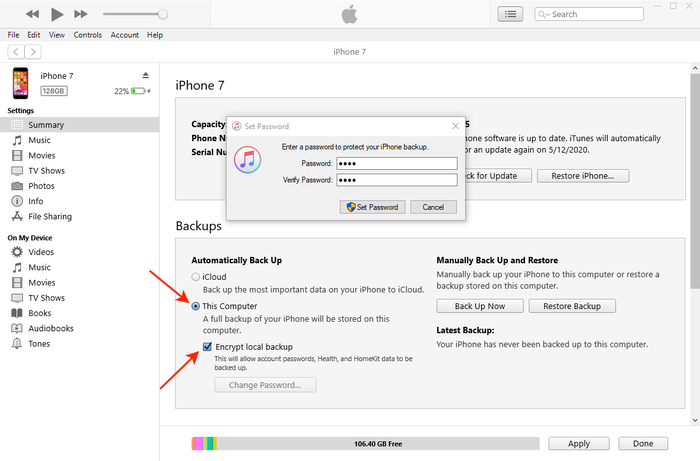
4. **Enter iTunes Backup Password :** If required, input the iTunes backup password for decryption, an essential part of the iTunes backup extraction guide.
5. **Review Recovered Data :** Scrutinize and document the recovered buried passwords and Siri commands, an integral aspect of the iOS device security with malware report.
Step 7 : Strategic iTunes Backup Analysis
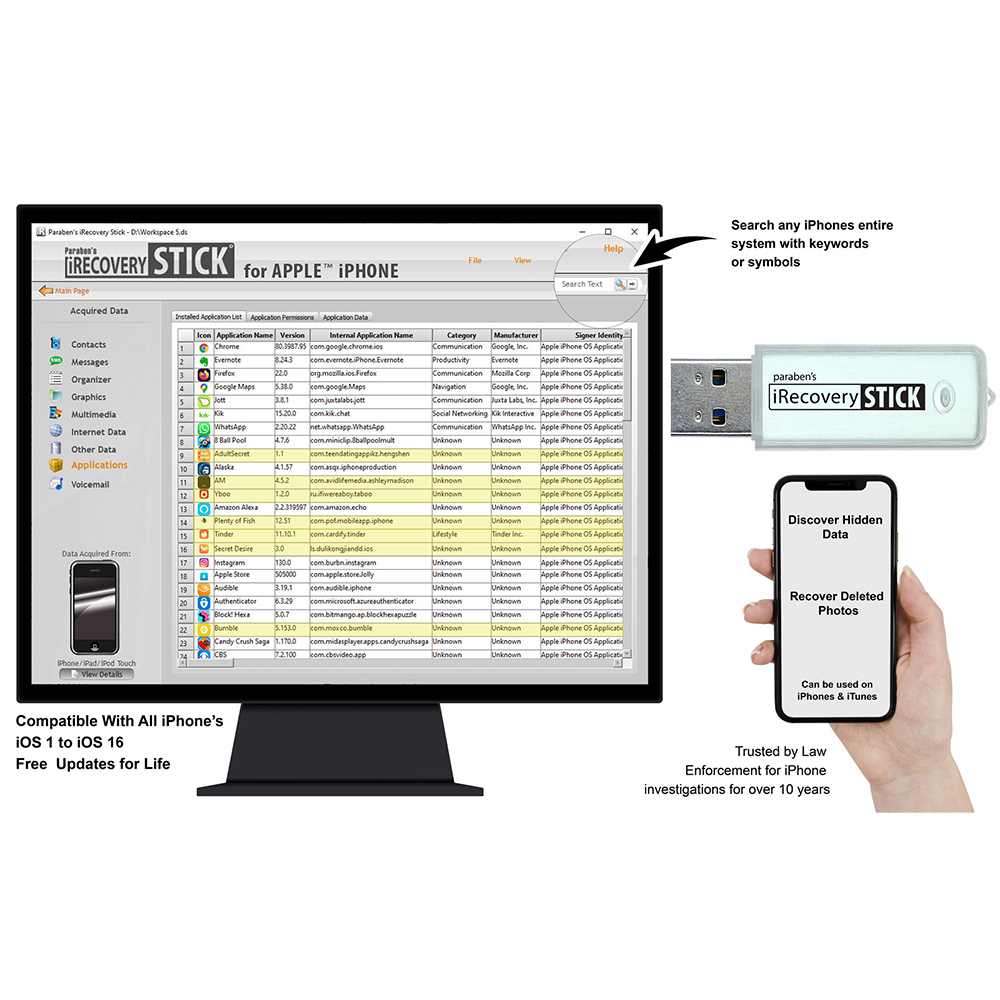
1. **Download iRecovery Stick :** If utilizing tools like the iRecovery Stick, download and install the software, a crucial step in the step-by-step iOS data recovery.
2. **Connect Device :** Use a USB cable to connect the iOS device to your computer, an essential part of the iRecovery Stick user guide.
3. **Launch iRecovery Stick :** Open the iRecovery Stick software on your computer, a pivotal point in uncovering buried insights on iPhone.
4. **Select Device :** Choose the connected iOS device from the available options, a crucial component in the iRecovery Stick vs. other tools comparison.
5. **Initiate Analysis :** Begin the analysis process to uncover buried data directly from iTunes backup files, a fundamental step in digital forensics on iOS devices.
Step 8 : Employ Malware Report for IT Security
1. **Access Settings :** Open the iOS device’s “Settings” app, a pivotal point in preventing security threats on iOS.
2. **Navigate to App Settings :** Locate and access app settings, often found in “Privacy” or “Security,” a crucial component in iOS data recovery tutorial.
3. **Enable Malware Report :** If applicable, enable the Malware Report feature within app settings, an essential part of hidden data recovery on iPhone.
4. **Review Reports :** Regularly review generated reports for buried insights into potential security threats and hidden app activities, a pivotal point in the digital forensics on iOS devices process.
iRecovery Stick : Elevate Investigations with Unmatched iOS Data Recovery
Step into the world of digital forensics where every piece of information is a puzzle waiting to be solved.
Meet the iRecovery Stick, your trusty ally in unraveling the mysteries hidden within iPhones and iPads.
Packed with advanced features, this tool takes investigations to a whole new level, breaking free from old-school methods.
With iRecovery Stick, you can effortlessly extract, reveal, and analyze data with unmatched accuracy, putting you in control of the digital narrative.
1. Search Function :
Description : The Search Function allows investigators to search for specific data using keywords and symbols within the extracted content.
How it works : Users can input relevant keywords or symbols, and the iRecovery Stick will scan the extracted data for matches, streamlining the process of locating pertinent information.
Use Case : Investigators can efficiently narrow down their focus to specific details crucial to the case.
2. Discover Hidden Content :
Description : iRecovery Stick is designed to unveil hidden content that may not be readily visible on the iPhone or iPad.
How it works : The tool employs techniques to uncover data that users may have attempted to conceal, providing investigators with access to potentially critical information
Use Case : This feature is valuable for revealing concealed communications or files that could be relevant to an investigation.
3. Reveal Images Hidden by Photo Hiding Apps :
Description : iRecovery Stick has the capability to reveal images that have been hidden using various photo hiding apps on the target device.
How it works : The tool identifies and extracts images hidden by applications specifically designed for hiding photos, ensuring a comprehensive view of the user’s media.
Use Case : Investigators can uncover concealed media files that might be relevant to the case or otherwise hidden from plain view.
4. Recover Recently Deleted Photos :
Description : iRecovery Stick enables the recovery of photos that have been recently deleted from the iPhone or iPad.
How it works : The tool accesses deleted files that may still be recoverable from the device’s storage, providing investigators with access to data that might have been intentionally removed.
Use Case : Recovering recently deleted photos can be crucial in piecing together a timeline of events or retrieving evidence that the user attempted to erase.
5. Bookmark, Download, and Export Evidence :
Description : iRecovery Stick allows users to bookmark important data, download it for offline access, and export evidence for further analysis or legal purposes.
How it works : Investigators can mark specific data points as crucial, download the information, and export it in a format suitable for inclusion in reports or legal proceedings.
Use Case : This feature aids in organizing and presenting key findings in a clear and structured manner.
6. Connect Directly to iTunes Backup Files :
Description : iRecovery Stick can connect directly to iTunes backup files, enabling investigators to perform discovery analysis without the physical presence of the iPhone or iPad.
How it works : The tool accesses backup files created by iTunes, allowing investigators to analyze the data without requiring the actual device.
Use Case : This feature is particularly useful when physical access to the device is not possible, providing a method for analysis through existing backup files.


